I knew about this project for the previous 3 weeks and spent some time looking for ideas. I contemplated about making a cool and useful project, but I was stumped. I decided to look for some ideas. I tried a few different Google searches, such as laser cutter ideas and laser cutter projects. One of the first hits was Thingiverse. Thingiverse is a website that is made for people doing projects similar to this one. However, it is geared more towards 3D printing rather than laser cutters. Thingiverse is interesting because it shows you the projects and has downloadable files for the projects. I did look at some stuff there, but I did't see anything I liked.
I moved onto a different website, it is one that I had never thought of using this way. Pinterest. Pinterest is actually useful to get ideas. It allows you to save or 'Pin' an article or picture. You can make different albums or 'boards' to put these articles into. Pinterest was great for finding different ideas, but most of the neat things were essentially an add for that item. The link to the object or article was typically for a store and more often than not, Etsy. Etsy is an online store for makers or artists. If you have something to sell that is a small scale run or a single item, Etsy is a good place to try.
Dr. Harris also showed us some ideas from previous classes and pointed us towards the FabEd websites. I really liked a particular project. This project is an object called a dice tower. You put dice into the top and it rolls them for you. The dice then roll into a little tray that catches them.
Before I messed around with any software, I sketched out some full sized plans on paper. The overall size is supposed to be 8 x 8 inches.
 |
| The sketch on graph paper |
I also did some calculations as to what would be the best angle for the slats. I did that using this set up:
 |
| Dice testing station |
After I tested what the optimum angle would be, I started to design a dice tower in some modeling software called Creo. I am using this software for another class, DFT 170. This class is a engineering graphics class. I thought that Creo would be a good choice because I need to do some technical layout, such as angles. Creo is a little binding though, you need to know exactly what you are going to do before you start. Here is a screenshot of the incomplete design:
 |
| Incomplete Creo model |
I decided to ditch Creo and try Inkscape, which worked fairly well. However, I quickly became over whelmed when I realized how hard it was. I needed to design the finger joints and size everything because I started from scratch. Designing a dice tower was too complicated and ambitious for my current skill set. I ran into another problem, it would not fit onto a 20 X 10 piece of cardboard. I reluctantly abandoned the idea of making a dice tower, but kept it in the back of my mind.
Anyway, I looked around Pinterest a came up with a few ideas and pinned them my 'board'. There are some neat projects, but I took a fancy to the idea of a lamp. I did find two cool examples. The first was a rocket ship shaped desk lamp. Sadly, this item was for sale and had no plans. I continued to looked around a bit more and found this lamp. This lamp is the same idea as the rocket ship one, but shorter, more compact, and shaped like a bomb. There were several different pictures, but once again it was an item for sale. Both of the articles lists the rough dimensions so I could guess the height. The two designs were too large for either design to fit on a single piece of cardboard, so I scrapped the idea.
I needed to find another project and by this time, it was two days before the project was due. I thought about what else I could do. Then I remembered the plywood reindeer that some people have in their yards around Christmas time. I designed and cut the reindeer and you can read about that project here. But here is a picture of them
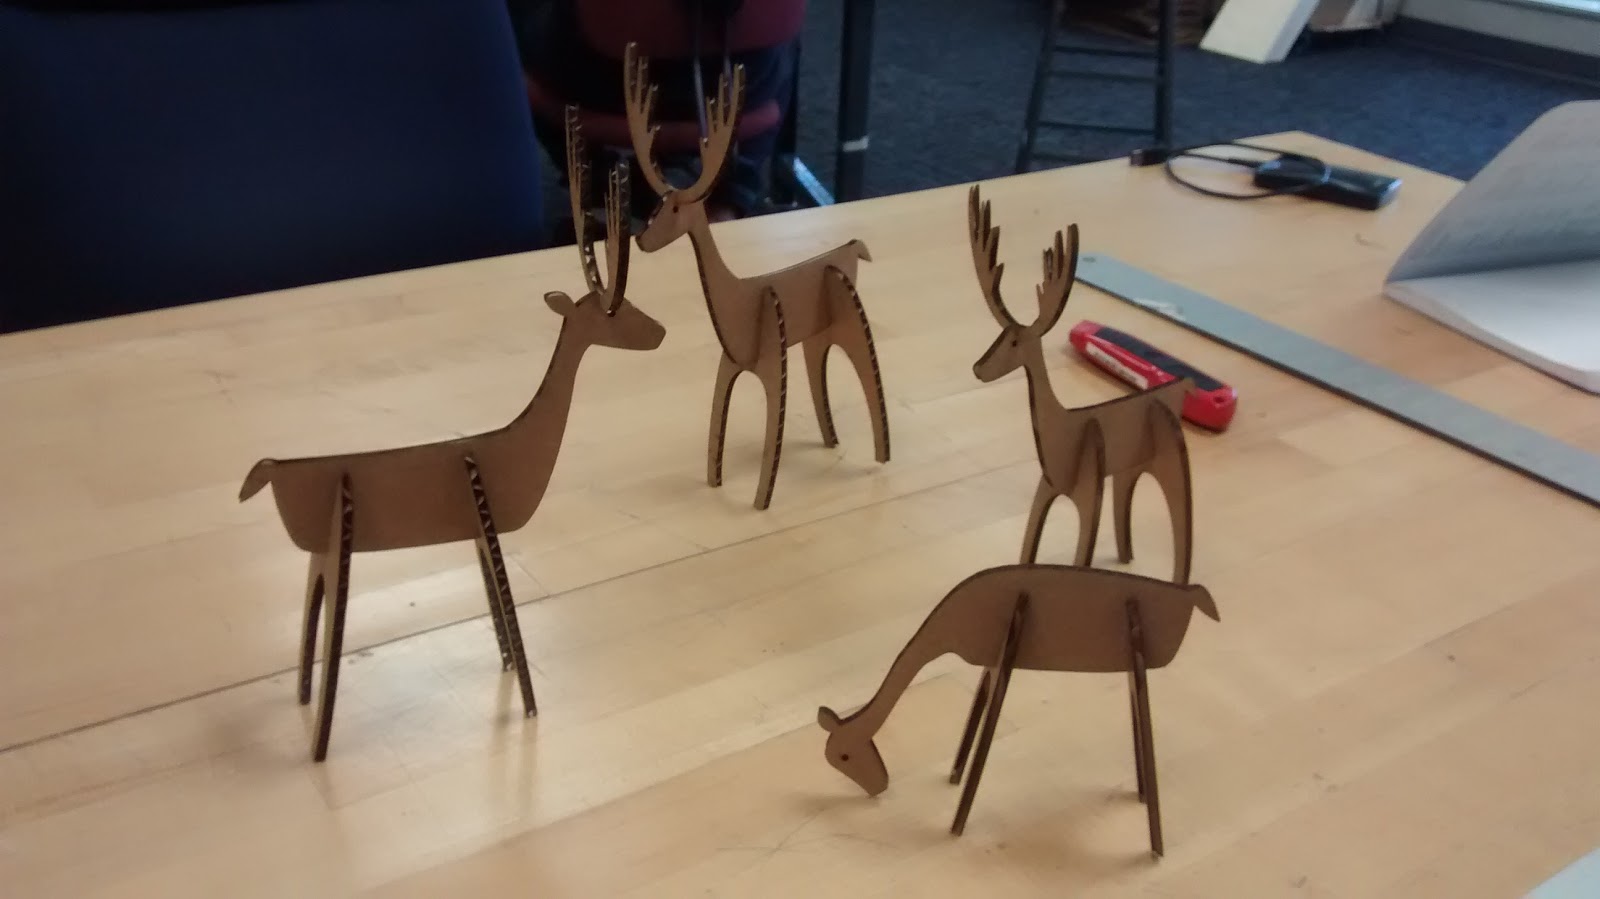 |
| A small herd of reindeer |
I went back to Inkscape and started again. I was rushed because the project was due in 1 1/2 days, not a whole lot of time. As I mentioned before, I tried to make the design from scratch, but I quickly became overwhelmed. I thought about it more and I realized that I could get a box design and then modify it, which is what I did. I went to a website that Dr. Harris recommended called MakerCase. MakerCase is quite handy, it allows you to input the size of the box and the thickness of material. You can also choose what size the finger joints are. It exports the designs to a PDF file for download.
I took the box designs and determined what would be the sides. I wanted the tower to be 8 inches tall and 4 inches wide. I used the largest finger joints I could which were .8 inch. I did this because it was easier to modify them later.
This is how the plans were modified. I took one of the side pieces and copied it. I then cut the bottom down to 1 inch thick and tacked it onto the left side of the box. That made the bottom 8 inches long. I then made a 1 inch square and rotated it 45 degrees and use the 'difference' option in Inkscape under the 'path' tab. I then took the same square and used it to make angle that joins the main tower to the tray.
I laid out the holes using this method:

I also had to make a 45 degree angle at the bottom. This layout was accomplished in a similar manner, but this slat was longer. I made extensive use of the measure tool in Inkscape. I made a .125 x 3.25 inch rectangle and rotated it to 45 degrees. I used the same line and spacing technique to layout this box. I then measured out the .8" slot and spaced it with two other rectangles. Here is the final product:
 |
| Final Side Layout |
I then designed the bottom. I simply took the bottom piece, copied it, and removed the finger joints from one end. I then pasted in another bottom and modified the two to fit the bottom of the side. I only had to remove the finger joints from the different side piece and size it to eight inches. I decided to dub this piece as 'back'. The front panel was made by taking the back and cutting of the bottom two inches. This made the over all length six inches.
So far I had made the sides, back, bottom, and front. The next challenge was making the slats. I measured the inside distance between the two sides. I decided to make the slats 1/8" smaller and the tabs to be 3/16". This ended up being just right. The tabs stick out just a hair width from the sides. I also rounded the corners of the tabs by modifying the lines. I simply increased the slat length to fit the 45 degree space. I did have to redo the tabs, but I simply cut and pasted those. I also had to make the front tab of the tray. I did this the same way as the 45 degree. The tab was replaced by the finger joint and the overall length was decreased.
Here are the final two sets of cuts laid out on a 10 x 20 inch document:
 |
| Cut 1 |
 |
| Cut 2 |
Once I completed the training for the laser cutter I could then use it. The videos explains how to use the laser cutter, so I recommend you to watch the videos. There are several different settings for the laser cutter. The main ones are the cutting parameters for the cut, such as speed and power. These settings are listed on the front of our machine. It is a simple piece of paper listing different materials and thicknesses of said material. It then lists the power and speed settings to use. The settings for cardboard were: 40% speed, 100% power, and 2500 frequency.
I then cut out the plans and assembled the tower. I brought my dice set into school and tested it there. I had to tape the tower together because the plans do not account for the kerf of the laser. I used some basic masking tape as it would come apart easily. Here is a picture of Cut 1:
 |
| Cut 1 |
Here are two views of the tower assembled:
 |
| Inside view of the back |
 |
| Inside view of the front. |
One of the things that impressed me was how accurate the laser cutter is. The cuts were exactly the same as on the PDF file. I could design a piece to be this exact size and it cut it to that size plus/minus a hundredth of an inch. I did have trouble learning how to use the cutter. I had to take the test about ten times because some answers were multiple choice and technically right though incorrect for the test. I did make a mistake with the actual design. The finger joints are 1/8 of an inch. This width is fine for a press fit slot cardboard slot, but the cardboard is a little less than 3/16 of an inch. The edges of the card board were slightly recessed and did not look that great. I modified the designs to account for that flaw. The finger joints are now .187 of an inch wide, just under 3/16.
This issue stemmed from me only making one other thing with the laser cutter. The only joint was a press fit slot joint and I assumed that 1/8'' would work for a finger joint. I was wrong. There was another issue, this joints were slightly too loose. There is a couple hundredth gap between the top and bottom of the finger joint. I went into the design file and corrected these errors. I did not cut out the corrected design because I will make my next one out of 1/8" wood. I want this next tower to last. There will be quite a few changes to make for that design.
If I could redo this project from the beginning I would cut a simple box first. This would show me what limitations the material has, the actual thickness, and how well the material cuts. Another thing I would do is get an existing plan and modify it from the beginning. I did not need to reinvent the wheel. I tried to do that when I first started, I did not need to design finger joints. The sizing would also be right.
Overall, this was a fun project. It was tedious, but rewarding. Watching the laser cutter cut out the pieces is a really neat thing to watch. I am looking for to playing with this machine more this semester.
Here are the finished files for the project:
PDF Cut 1
PDF Cut 2
SVG Cut 1
SVG Cut 2
No comments:
Post a Comment